In this article, we’ll explain in detail the Python Numpy eye function. Starting from its definition, then progressing forward to the eye() function parameters, and finally understanding its usage with proper practical Python code examples.
What is Python Numpy Eye Function?
The eye() functions come from the Numpy library. The role of this function is to generate a 2D array that has ones on the diagonal and zeros elsewhere. The common usage of this function is to create identity matrices. These type of matrices are square that has ones on the main diagonal while zeros are positioned everywhere else.
Syntax of eye() Function
numpy.eye(N, M=None, k=0, dtype=<class 'float'>, order='C')
Explanation of eye() Parameters
- The first parameter ‘N‘ specifies the number of rows that will be shown in the resulting array.
- (Optional parameter): The second parameter ‘M‘ is used to set the number of columns in the array that will be generated by the eye() function. If we don’t provide it any value then by default, it’ll be taken as equal to ‘N‘(first parameter) which means the number of rows.
- (Optional parameter): The parameter ‘k‘ shows the diagonal’s index. The value that is given to this parameter by default is 0(zero) which refers to the main diagonal. If we give it a positive value then it’ll refer to an upper diagonal and a negative value will refer to a lower diagonal.
- (Optional parameter): The parameter ‘dtype‘ shows the data of the resulting array. The default value that is given to it is ‘float‘.
- (Optional parameter): The ‘order‘ parameter takes ‘C’ (row-major order) or ‘F’ (column-major order). We can set how the array should be stored using the order parameter. ‘C‘ is the default value provided to this parameter.
Understanding Numpy eye() Function with 3 Examples
Example 1: Create 3×3 Identity Matrix using eye() Numpy Function
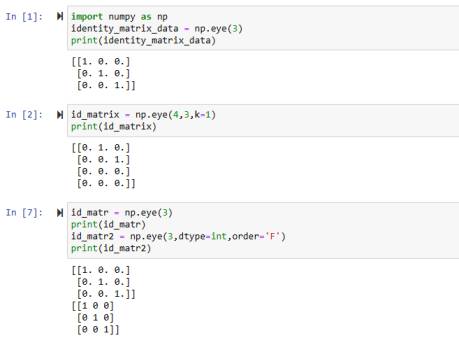
import numpy as np

identity_matrix_data = np.eye(3)

print(identity_matrix_data)
Output
[[1. 0. 0.]
 [0. 1. 0.]
 [0. 0. 1.]]
This code shows importing a Numpy library that is crucial for using the eye() function. Then we create a 3×3 identity matrix using the numpy eye() function which has ones on the main diagonal and zeros elsewhere. As we’ve discussed earlier that if we don’t provide the number of columns then by default, the number of rows(first parameter value) will be assumed as the number of rows.
Example 2: 4X3 Identity matrix with upper diagonal (Parameters ‘M’ and ‘k’)
id_matrix = np.eye(4,3,k=1)
print(id_matrix)
Output
[[0. 1. 0.]
 [0. 0. 1.]
 [0. 0. 0.]
 [0. 0. 0.]]
In this code example, we’ve created an identity matrix of 4×3. Also, we’ve shifted the diagonal to the upper position using the parameter ‘k‘. We’ve learned earlier that providing a positive value to ‘k‘ will shift the diagonal to the upper position and a negative value will take it to the lower position.
The second argument specifies the number of columns. For this example, we’ve set it to be 3 columns.
Example 3: Implementing the Parameters(‘dtype’ and ‘order’)
id_matr = np.eye(3)
print(id_matr)

id_matr2 = np.eye(3,dtype=int,order='F')
print(id_matr2)
Output
Explaining the code
In the first part of this example, we’ve created a 3×3 identity matrix. We’ve only specified the rows and it’ll give the same number of columns as rows, by default. The order will also be set to ‘C‘ (row-major order) by default which means the matrix will be specified row-wise.
In the second part, we’ve also created a 3×3 identity matrix. But in this case, we specified the data type to an integer using the ‘dtype‘ constructor. Also, we specified the order to be ‘F‘(column-major order).
The output shows the first matrix having float values in ‘C‘ order while the second matrix displays the values in integer format(default value assigned to parameter ‘dtype‘ is float) and with ‘F‘ order which means the resulting matrix will be generated column-wise.
Conclusion
In conclusion, we’ve gone through the practical steps on how to properly use the Python Numpy eye function. To make the explanation more understandable, we used multiple Python code examples in which we explained all the parameters of the eye() function.
Thank you very much for reading it.
